Sort by:
11 products
11 products
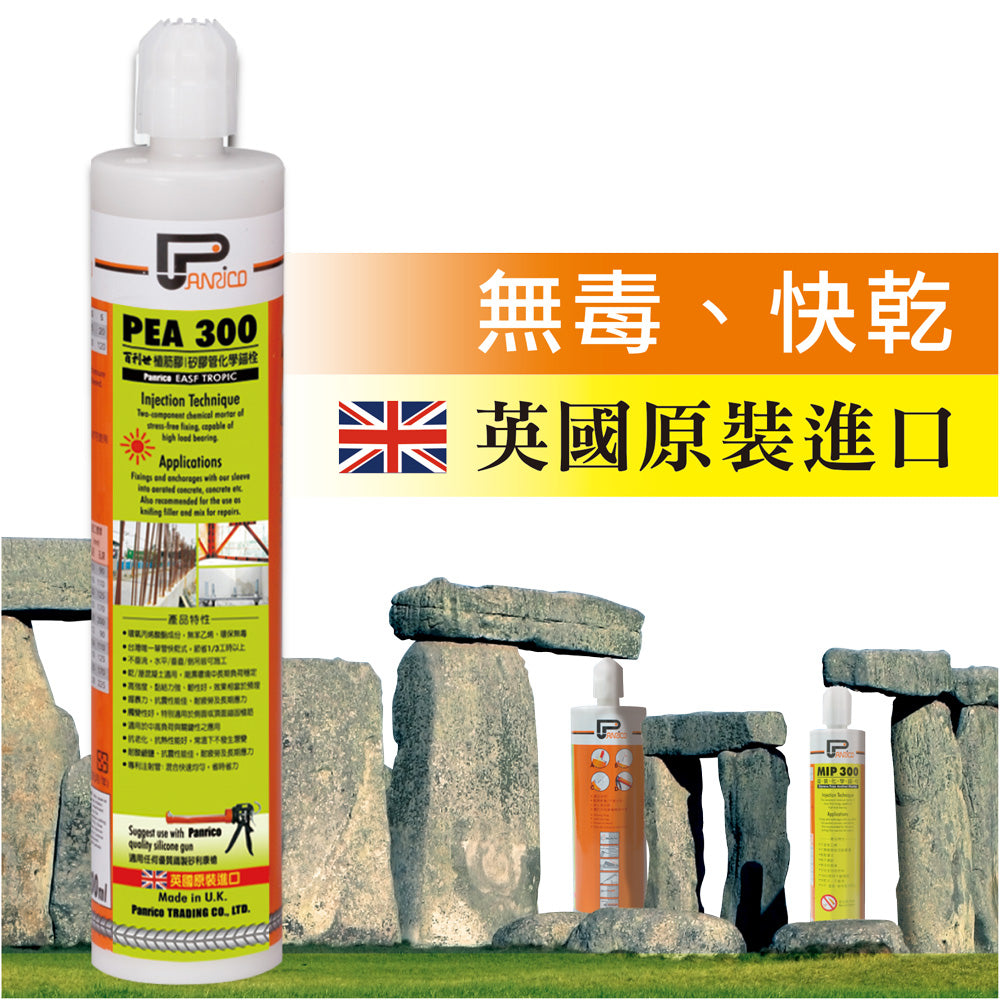
The rebar anchor glue (adhesive chemical anchor/rebar anchor adhesive) is imported from the UK, with epoxy acrylate ingredients, non-toxic, odorless, and styrene-free. It is the only quick-drying rebar anchor glue introduced in Taiwan, which dries quickly, does not sag, and can be installed upside down.
ETA European Technical Approval Certification from the European Technical Approval Organization EOTA.
Product Features:
- Single tube quick-drying tropical anchor glue (chemical anchor bolt/chemical anka adhesive), economical and environmentally friendly, exclusive patented new design of replaceable agent package, no residual glue left
- Quick-drying tropical anchor glue, epoxy acrylate ingredients, styrene-free, environmentally friendly and non-toxic
- The only single-tube quick-drying anchor glue introduced in Taiwan, saving more than 1/3 of the working hours
- PEA300 adhesive chemical anchor bolt, no sag, can be installed horizontally, vertically or inverted
- Applicable to both dry and wet concrete, stable load over a long period of time in a humid environment
- High strength, strong bonding, good toughness, the effect is equivalent to pre-embedded
- Grip strength, good shock resistance, fatigue resistance and long-term stress resistance
- Good thixotropy, especially suitable for side or top surface anchoring
- Suitable for medium to high load and critical applications
- Quick-drying tropical anchor glue has good anti-aging and heat resistance, and does not creep at room temperature
- Acid, alkali and salt resistance, good earthquake resistance, fatigue resistance and long-term stress resistance
- Patented injection tube for quick-drying tropical anchor glue, which mixes the anchor glue quickly and evenly, saving time and effort
- No need to cut or slit the cover, just loosen the cover and lock the mixing tube for use
- The quick-drying anchor glue (chemical anchor bolt/chemical anka adhesive) is an exclusive patented design and can be used with a general high-quality professional silicone gun or anchor glue gun.
Scope of application:
- Expansion and modification of old buildings, industrial design changes, and other structural reinforcement
- The new construction project does not reserve steel bars, such as sky gardens, railings, walls, continuous walls, beams, columns, floor slabs, etc. Foundation bolts
- Large projects, such as public construction, civil engineering, bridges, roads, etc.
- Anchorage connection between steel structure and concrete structure
- Planting of steel bars and bolts in concrete construction
- Curtain wall stone dry hanging bracket fixing
- Fixing of road noise insulation panels and guardrails
- Various industrial machinery and equipment foundation fixing
Operation time:
| Substrate temperature | 5℃ | 15℃ | 25℃ | 35℃ | 45℃ |
| Operation time (gelling)/minute | 45 | 18 | 10 | 5 | 2 |
| Load-bearing time (curing)/minute | 120 | 75 | 45 | 30 | 15 |
※ There is a difference between the temperature inside the concrete and the surface temperature. Please measure it yourself.
Construction Note:
- Please first inject 5cm of the rebar glue and make sure the two doses are evenly mixed before use.
- The length of the mixing tube cannot be cut arbitrarily, and the spiral strips inside the tube cannot be discarded to avoid uneven mixing.
How to save:
- Storage temperature: 5~25℃
- Avoid direct sunlight to prevent the medicine from deteriorating
Construction instructions:
Concrete construction steps description:
- Drilling: Use an impact drill to drill holes according to the specified hole diameter and hole depth. Please refer to the technical data
- Hole cleaning: Use a steel brush to remove debris from the hole, and use a blower or other tools to blow the hole clean.
- Placement: After the mixing tube is filled with the rebar glue, it is placed in the professional silicone gun
- Mixing: Discard the 5 cm of adhesive that was not fully mixed at the beginning.
- Glue injection: Inject the anchor glue into the hole
- Implantation: Inserting steel bars or screws must be completed within the specified operation time
- Curing: During the curing process of the anchor glue, do not touch the steel bars or screws.
- Loading: After fully solidified, load and tighten
Capacity: 300ml
Origin: United Kingdom

B+BTec glass chemical anchors imported from the Netherlands (chemical anchors, chemical anchors, anchor reinforcement chemical tubes, chemical bolt anchors, chemical anchors), can be used for underwater construction, and are suitable for various vibration loads , foundation bolts, steel plate fixation, and reinforcement. It is quickly consolidated after installation and has high bearing capacity.
Obtained ETA European Technical Approval Certification, which is similar to ICC-ES AC58 / AC308 (formerly known as ICBO) and ASTM E 1512.
feature of product:
- Dutch B+BTec glass chemical anchors, unparalleled fastening power, cannot be replaced by any Anka
- Rotating the implant instantly cleans the hole wall, mixes glass and quartz particles, carves the wall surface and quickly removes dust.
- The risk of failure rate can still be maintained to a minimum when performed by non-permanent professional staff ~ almost "zero"
- Providing accurate dosage and equal-proportion mixing guarantee
- Construction temperature ranges from -5℃ to 40℃, wide application range
- Glass chemical anchors (chemical anchors) are suitable for heavy loads and various vibration loads
- Glass chemical anchors (chemical anchors) are suitable for various operations and underwater construction (can be used in humid environments)
- Glass chemical anchors (chemical anchors) are suitable for small spacings, margins and narrow spaces
- Glass chemical anchors (chemical anchors) do not produce compressive stress on concrete and can be used on various base materials
- Glass chemical anchors (chemical anchors) are completely bonded to the structure, resistant to vibration and heat, not weathered, not aged, acid and alkali resistant, and corrosion resistant
- Glass chemical anchors (chemical anchors) provide the shortest hardening time and greatly improve efficiency
- Non-parallel expansion reaches maximum gripping force
- The creep life has actually been proven to exceed 40 years, with no failure record.
- The only number of pull-out tests after installation is almost single digits, and it is currently the safest construction method.
- Taking quality assurance, follow-up service and testing costs into consideration, it is actually the most economical gravity-type fixed series.
- The longest retention period (more than two years)
Application scope:
- No steel bars are reserved for new construction projects, such as atrium garden railings, continuous walls, beams, columns, floor slabs, etc.
- Addition, renovation, engineering change design or structural reinforcement of old buildings
- Ports, bridges, high-load structures
- Shade project
- It can fix heavy machinery equipment, wall panels and crane tracks, safe and reliable
Installation steps instructions:
- Drill holes in concrete using a power hammer drill using the recommended hole diameter and depth.
- Use a diamond drill to drill holes where the steel bars need to be penetrated.
- Use a brush, blower or water to clean the hole.
- Check the chemical anchor agent tube to confirm that it is not damaged and that the resin inside can flow normally.
- Insert the medicine tube into a clean hole with the round head facing inward.
- Make sure the screw is clean, use the installation tool and electric hammer drill to rotate the screw to the bottom of the hole at a uniform speed (it is recommended that the electric hammer drill speed is 250-500rpm) to rupture the medicine tube and allow the medicine to be fully mixed.
- Check whether there is any chemical overflow on the surface of the hole to ensure that the hole is full; check whether the screw burial depth reaches the surface of the base material to ensure that the screw reaches the required burial depth.
- Wait for the agent to cure according to the recommended curing time. During this period, do not collide or knock the chemical anchors.
- Install artifacts
Origin: Netherlands
Product Features:
- Taiwan-made injection-type anchor glue, professional steel structure reinforcement or equipment foundation fixing material
- Mungo 4300 injection anchoring glue is made of epoxy resin and is used for anchoring or chemical bonding bolts. It has strong holding power, long working time and good operability.
- The injection adhesive is quick, easy and clean to apply, shortening the construction period. Seven days after the application, the strength can reach 100% of the maximum load effect.
- Chemical Anka adhesives are fixed by adhesion, which will not damage the concrete but also strengthen it. The bond strength is greater than the raw material structure.
- Mungo 4300 injection adhesive has strong fixing force and is suitable for a variety of different substrates
- Rebar adhesive, styrene-free, no pungent odor
- The anchor glue has super strong adhesion and does not shrink
Scope of application:
- New construction without reserved steel bars, atrium gardens, railings, and wall fixings
- Secondary construction structural reinforcement, beams, columns, floor slabs, and scaffolding fixation
- Continuous wall, retaining wall, shear wall
- Used for expansion, reinforcement and repair of bridges, tunnels and houses
- Screw fixing and steel bar anchoring of heavy equipment brackets
- Bolt anchoring of roads and railroad subgrades and rebar planting of floor slabs
Installation environment:
Installation method:
Specifications:
Capacity: 360ml
Special implant injection gun:
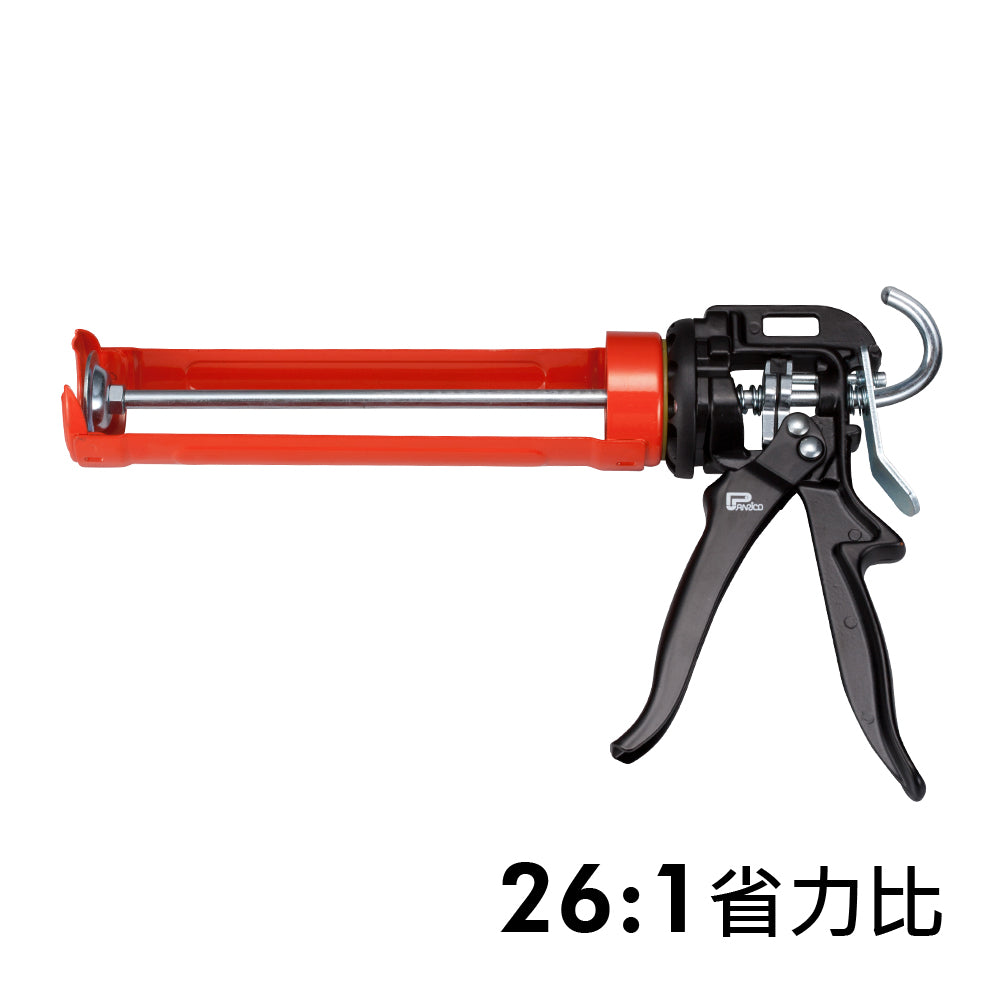
345ml professional double liquid iron rebar glue gun

- Professional double-liquid iron glue gun made in Taiwan (professional two-liquid glue glue gun, professional two-liquid glue glue syringe, professional double-liquid glue glue gun for glue glue)
- Two-liquid type iron professional glue implanting injection gun with long service life
- The labor-saving design of the spring mechanism of the reinforcement gun makes construction effortless.
- The reinforcement syringe strengthens the structure, is easy to operate, and can be constructed by yourself
- Special caulking injection gun for tendon implantation, with stable push volume and easy control of injection flow
Product specifications:
- Injectable capacity: 235ml
- Reinforcement glue mixing ratio: 1:10
Introduction to use:
- Put the reinforcement glue (injectable chemical adhesive) into the special reinforcement glue gun, slowly pull the trigger, and discharge the thinner glue from the mouth of the platinum bag and discard it.
- Insert the spiral mixing nozzle into the bottom of the hole. If the length is not enough, use a plastic tube to extend it.
- Pull the trigger, move the trigger hole once, and move the syringe back once to discharge the air in the hole.
- In order to make the hole full of glue after the steel bar is implanted and prevent the glue from flowing out, the hole should be filled with glue up to 80%. The steel bar should be planted immediately after the hole is filled with glue.
- Made in Taiwan, the professional iron glue gun is made in Taiwan (the iron professional glue gun, the iron professional glue syringe, the iron professional silicone gun, the iron professional silicone gun, the iron professional silicone gun) Special caulking injection gun for glue gun)
- 26:1 labor-saving ratio, the mechanism design is labor-saving and easy to promote
- Iron professional type reinforcement glue and silicone special reinforcement gun
- Glue implant syringe, strengthened structure, easy to operate
- Glue planting gun/glue planting syringe, the push amount is stable, the injection flow is easy to control, and the amount of glue planting can be saved
- It has a good effect when used with our company's MIP300/PEA300 reinforcement glue. It can also be used with reinforcement glue from different brands.
Applicable: 300ml (including the following) glue or silicone
Introduction to use:
- Make sure the surface to be followed by caulking is dry and clean
- Cut the silicone glue front end
- Connect the catheter head, and then cut off the catheter head at a 45° angle according to the output volume.
- Install the silicone onto the silicone gun
- You can put paper masking tape on both sides of the construction area (or tear off the tape without leaving any adhesive residue) to prevent the silicone from sticking to other places.
- Apply silicone to the construction site
Applicable Products:
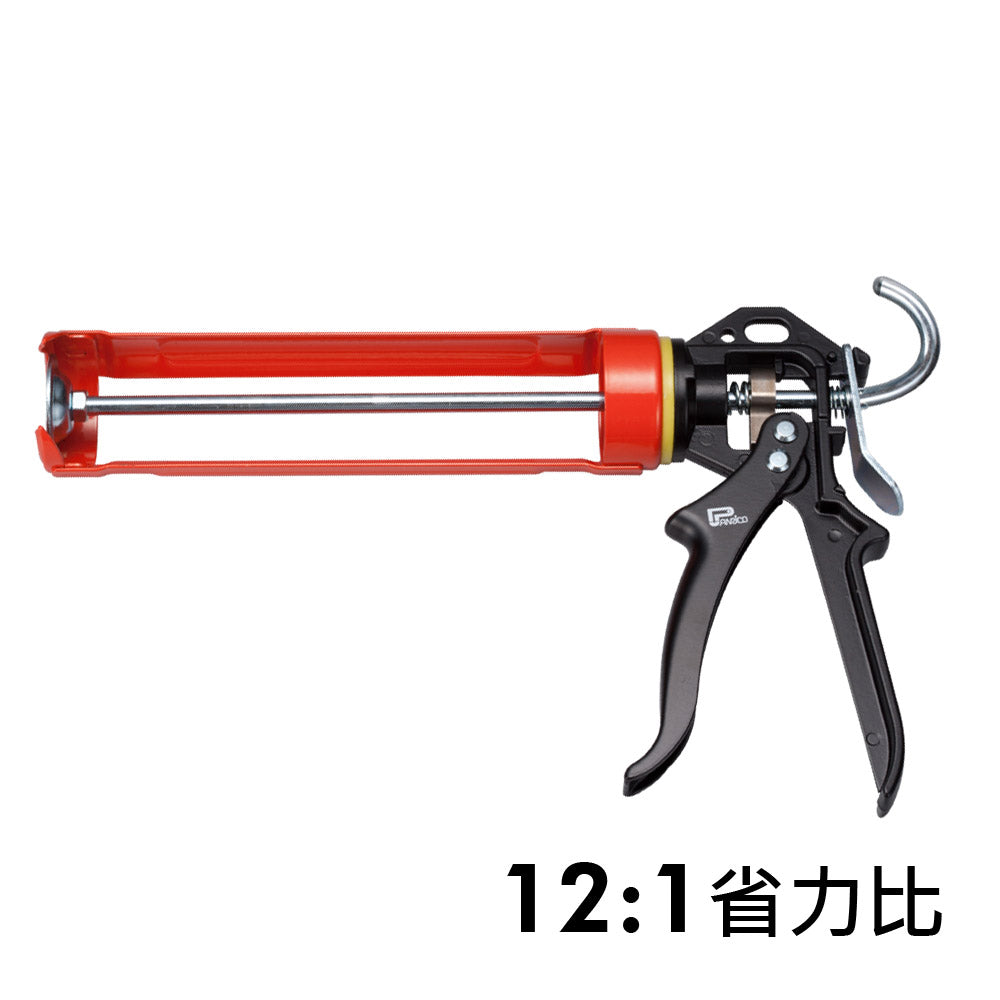
- Iron professional silicone gun made in Taiwan (iron professional silicone gun, iron professional silicone gun special caulking injection gun, iron professional caulking repair waterproof caulking repair tool)
- 12:1 labor-saving ratio design, labor-saving and easy to promote
- The iron professional silicone gun is suitable for silicone caulking. It is a special caulking injection gun. It has a professional grade reinforced structure and is easy to operate.
- Silicone gun, the push volume is stable, the injection flow is easy to control, and the silicone consumption can be saved
- Special caulking injection gun for silicone gun. It is a dual-use type and can inject silicone and professional high-viscosity agents.
Applicable: 300ml (including the following) silicone
Introduction to use:
- Make sure the surface to be followed by caulking is dry and clean
- Cut the silicone glue front end
- Connect the catheter head, and then cut off the catheter head at a 45° angle according to the amount of output.
- Install the silicone onto the silicone gun
- You can put paper masking tape on both sides of the construction area (or tear off the tape without leaving any adhesive residue) to prevent the silicone from sticking to other places.
- Apply silicone to the construction site
- Professional double-liquid iron glue gun made in Taiwan (professional two-liquid glue glue gun, professional two-liquid glue glue syringe, professional double-liquid glue glue gun for glue glue)
- Two-liquid type iron professional glue implanting injection gun with long service life
- The labor-saving design of the spring mechanism of the reinforcement gun makes construction effortless.
- The reinforcement syringe strengthens the structure, is easy to operate, and can be constructed by yourself
- Special caulking injection gun for tendon implantation, with stable push volume and easy control of injection flow
Product specifications:
- Injectable capacity: 345ml
- Reinforcement glue mixing ratio: 1:10
Introduction to use:
- Put the reinforcement glue (injectable chemical adhesive) into the special reinforcement glue gun, slowly pull the trigger, and discharge the thinner glue from the mouth of the platinum bag and discard it.
- Insert the spiral mixing nozzle into the bottom of the hole. If the length is not enough, use a plastic tube to extend it.
- Pull the trigger, move the trigger hole once, and move the syringe back once to discharge the air in the hole.
- In order to make the hole full of glue after the steel bar is implanted and prevent the glue from flowing out, the hole should be filled with glue up to 80%. The steel bar should be planted immediately after the hole is filled with glue.
Use with reinforcement glue:
Made in Taiwan Mungo 4300 reinforcement glue
feature of product:
- Denmark imported iron professional silicone gun (iron professional silicone gun, iron professional glue gun, iron professional glue gun)
- Suitable for silicone and reinforcement glue, it is a special caulking injection gun, professional grade
- Strengthen the structure and make it easy to operate
- Silicone gun, the push volume is stable, the injection flow is easy to control, and the silicone consumption can be saved
- Special caulking injection gun for silicone gun. It is a dual-use type and can inject silicone and tendon implant glue.
Product specifications:
- Suitable for silicone and tendon implants Capacity: 380ml
Introduction to use:
- Make sure the surface to be followed by caulking is dry and clean
- Cut the silicone glue front end
- Connect the catheter head, and then cut off the catheter head at a 45° angle according to the amount of output.
- Install the silicone onto the silicone gun
- You can put paper masking tape on both sides of the construction area (or tear off the tape without leaving any adhesive residue) to prevent the silicone from sticking to other places.
- Apply silicone to the construction site
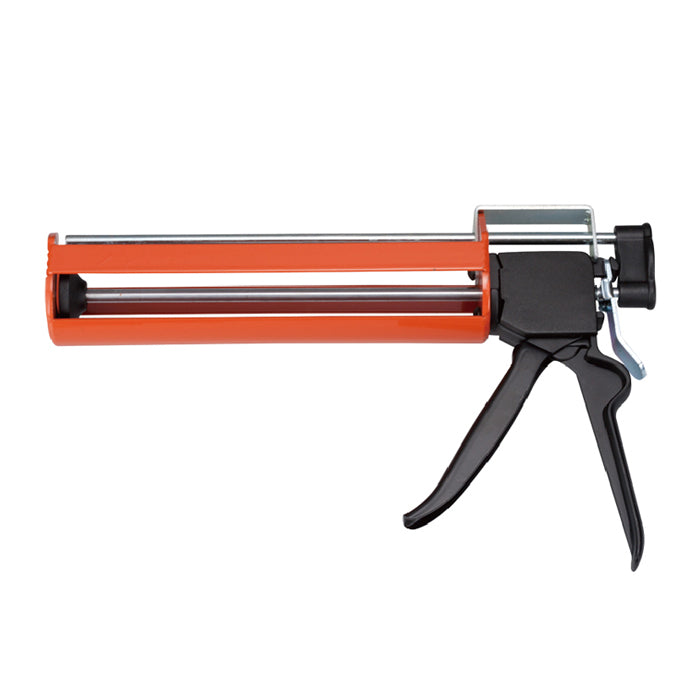
- Made in Taiwan, aluminum alloy round tube injection gun silicone gun (round tube silicone gun, aluminum alloy wax sausage type glue gun)
- Round tube injection gun silicone gun, aluminum alloy reinforced structure, easy to operate
- Wax sausage-type glue gun, with stable pushing volume and easy control of injection flow
- Suitable for bagged caulking adhesives, such as silicone, polychloride caulking agent, epoxy resin glue and other products
Product specifications:
- Product material: high strength aluminum alloy
- Applicable capacity: 600ml or 300ml wax sausage bag

- Made in Taiwan, a two-liquid iron glue gun (double-liquid glue gun, two-liquid glue syringe, and a special caulking injection gun for two-liquid glue)
- Two-liquid type iron-made reinforcement glue injection gun with long service life
- The labor-saving design of the spring mechanism of the reinforcement gun makes construction effortless.
- The reinforcement syringe strengthens the structure, is easy to operate, and can be constructed by yourself
- Special caulking injection gun for tendon implantation, with stable push volume and easy control of injection flow
Product specifications:
- Injectable capacity: 600ml
- Reinforcement glue mixing ratio: 1:1
Introduction to use:
- Put the reinforcement glue (injectable chemical adhesive) into the special reinforcement glue gun, slowly pull the trigger, and discharge the thinner glue from the mouth of the platinum bag and discard it.
- Insert the spiral mixing nozzle into the bottom of the hole. If the length is not enough, use a plastic tube to extend it.
- Pull the trigger, move the trigger hole once, and move the syringe back once to discharge the air in the hole.
- In order to make the hole full of glue after the steel bar is implanted and prevent the glue from flowing out, the hole should be filled with glue up to 80%. The steel bar should be planted immediately after the hole is filled with glue.
- Silicon special caulking injection gun, the best tool for home DIY
- Silicone gun, made of ABS nylon, light weight, good toughness, impact resistance
- Strengthened structure, easy to operate, can be constructed by yourself
- Silicone gun, skeleton type, light and easy to carry, with needle attached
- The silicone gun pushes a steady amount, making it easy to control the injection flow and saving silicone consumption.
Product specifications:
- 310ml
- Body ABS nylon material
Introduction to use:
- Make sure the surface to be followed by caulking is dry and clean
- Cut the front end of silicone glue
- Connect the catheter head, and then cut off the catheter head at a 45° angle according to the amount of output.
- Install the silicone onto the silicone gun
- You can put paper masking tape on both sides of the construction area (or tear off the tape without leaving any adhesive residue) to prevent the silicone from sticking to other places.
- Apply silicone to the construction site